
Pests and Diseases
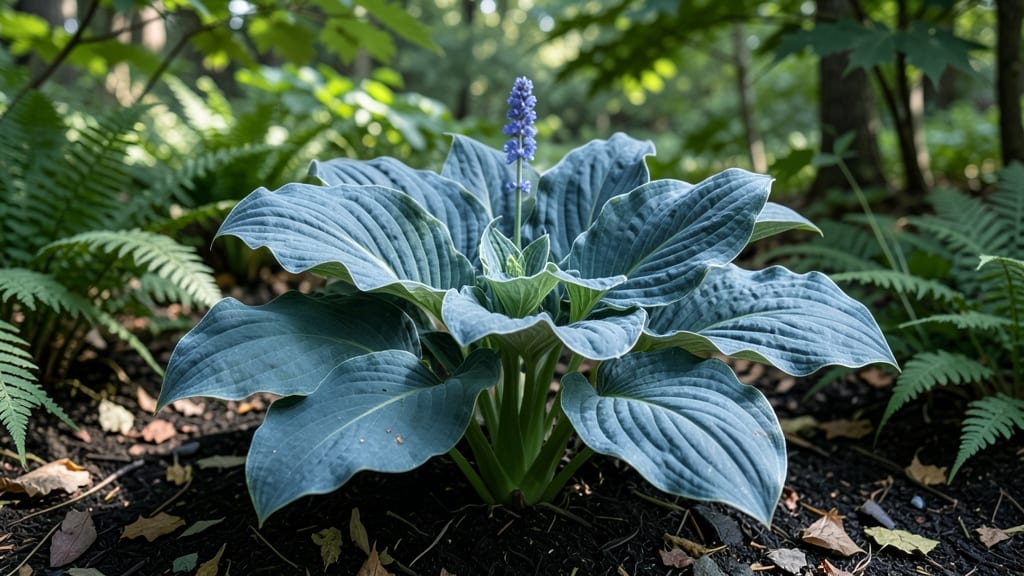
Growing curly leaf hosta transforms shady corners into lush, perfect foliage displays that steal the show. 🌿 I’ve nurtured these dramatic plants for years, and the key to their success lies in mimicking their native woodland habitat—cool, moist, and sheltered.
The wavy, chartreuse-and-cream leaves aren’t just pretty; they’re tougher than they look, thriving where other plants struggle.
Start by planting in partial to full shade (they’ll tolerate morning sun but scorch in hot afternoons) and rich, well-draining soil. Space them 2-3 feet apart—closer, and they’ll compete; farther, and the effect feels sparse.
Dig a hole twice as wide as the root ball but no deeper, then water deeply to settle the soil. Mulch heavily with shredded leaves or bark to keep roots cool and moisture locked in.
Watering is where most gardeners trip up: curly leaf hostas hate soggy roots but also dry spells. Aim for 1 inch of water weekly, more in summer heat.
Fertilize lightly in spring with a balanced formula—too much nitrogen makes leaves floppy, not curly. Prune only to remove damaged foliage; their texture comes from natural growth, not shearing.
Divide clumps every 3-4 years when centers go bare, and watch them bounce back with fresh vigor. The real secret? Patience. These plants take 2-3 seasons to hit their boldest variegation, but once they do, they’re the neighborhood’s best-kept shade secret.
📚 In This Guide
- What you need
- Instructions
- Tips and common mistakes
- Wrapping up and next steps
What you need
- ● Curly leaf hosta plants: 1-3 mature plants (or divisions) with healthy, variegated foliage. Look for Hosta 'Curly Signal' or similar cultivars.
- ● Well-draining potting mix: 5-10 gallons (depending on pot size). Use a blend of peat moss, perlite, and compost (3:1:1 ratio) for optimal aeration.
- ● Containers or garden bed: For containers: 12-18" diameter pots with drainage holes (1 per plant). Terracotta or fabric pots work best.
- ● For in-ground planting: A partially shaded spot with loose, moist soil (amend with 2-3 inches of compost if needed).
- ● Mulch: 2-3 inches of shredded bark or pine needles to retain moisture and suppress weeds.
- ● Garden trowel or shovel (for planting/dividing).
- ● Pruners or shears (sterilized with rubbing alcohol) for trimming damaged leaves.
- ● Garden gloves (to protect hands from rough foliage).
- ● Watering can or hose with a gentle spray nozzle (hostas prefer consistent moisture).
- ● Slow-release fertilizer (e.g., 10-10-10 or balanced organic fertilizer) for spring feeding.
- ● Slug bait or copper tape (curly leaf hostas are a slug magnet—prevention is key!).
- ○ Support stakes or rings (optional, for heavy foliage in containers).
Step-by-step instructions for planting curly leaf hostas
Here's how to create a stunning shade garden with these prized variegated beauties.
🌱 Step 1: Choose the Perfect Planting Location
Curly leaf hostas thrive in partial to full shade—think 4-6 hours of morning sun with afternoon shade protection. I always test the spot by observing how other shade plants perform there first. The ideal location receives dappled sunlight through trees or a north-facing wall.
Check the soil moisture by digging down 6 inches—it should feel consistently damp but not soggy. If your yard drains poorly, amend the area with 2-3 inches of compost mixed into the top 8 inches of soil. This improves drainage while retaining moisture, which curly leaf hostas love.
☀️ Step 2: Prepare the Planting Hole
Dig a hole twice as wide as the hosta's root ball but only as deep as the container it came in. This prevents burying the crown too deeply, which can cause rot. I like to loosen the sides of the hole with a fork to encourage root spread into surrounding soil.
Add a handful of slow-release fertilizer (like 10-10-10) to the bottom of the hole—just enough to coat the roots when you place the plant. Mix in 1 cup of compost with the native soil to give your hosta a nutrient boost right from planting.
🪴 Step 3: Plant and Water for Establishment
Remove the hosta from its container and gently tease apart any circling roots. Place it in the hole so the top of the root ball sits level with the surrounding soil—never deeper. The crown (where leaves meet roots) should be just above soil level to prevent water pooling.
Backfill with native soil mixed with compost, pressing lightly as you go. Water deeply until moisture reaches 4-6 inches down—you'll know it's enough when water runs out the bottom of the hole. Mulch with 2-3 inches of shredded bark to conserve moisture and suppress weeds.
💧 Step 4: Maintain for Year-Round Health
Water 1-2 times per week during the first growing season, keeping the soil evenly moist but never soggy. You'll know it's right when the top 2 inches of soil feel damp to the touch. After establishment, curly leaf hostas are drought-tolerant but reward consistent moisture with bold variegation.
Apply balanced fertilizer (like 20-20-20) in early spring and again in mid-summer—just follow the package rate for shade plants. I always fertilize after a soaking rain to prevent root burn. Deadhead spent flowers in late summer to keep the plant looking tidy.
✂️ Step 5: Divide and Propagate Every 3-4 Years
Curly leaf hostas multiply quickly—when clumps reach 12-18 inches across, it's time to divide. I dig up the entire plant in early spring or fall, then gently separate the crowns with a sharp knife, making sure each piece has 3-5 leaves and some roots.
Replant the divisions immediately in prepared soil, water deeply, and mulch. The original plant will regrow within 2-3 weeks, and your divisions will establish just as beautifully. This keeps your hostas vibrant and vigorous for years to come.
Tips & tricks for perfect curly leaf hosta planting
Here's what I learned after years of growing these stunning variegated beauties—tricks that make all the difference between good and show-stopping hostas.
Light Location Secrets: That 4-6 hours of morning sun is crucial, but what matters most is the quality of shade. I've found that hostas with dappled sunlight (like through tree leaves) show the most dramatic variegation. If you're planting under dense evergreens, consider adding a reflective surface like a light-colored wall or gravel to bounce extra light onto the foliage. The goal is to maximize that golden-yellow variegation without causing leaf scorch.
Soil Prep That Makes a Difference: When amending soil with 2-3 inches of compost into the top 8 inches, don't just mix it in—create a "compost pocket" around the root ball. This creates a nutrient-rich zone where new roots will establish most quickly. For heavy clay soils, add 10% perlite or coarse sand to improve drainage while maintaining moisture retention. The key is mimicking their natural woodland habitat where soil stays consistently damp but never waterlogged.
Planting Depth is Everything: I can't stress enough how critical the crown position is—it should sit just above soil level, never buried. When I first started, I buried crowns too deeply (thinking it would protect them), and within weeks, the plants developed rot. Use a small stick to mark the original soil level on the container before planting. Also, avoid compacting the soil too firmly when backfilling—hosta roots need loose soil to spread easily.
Watering Wisdom: Those 1-2 times per week waterings in the first year are non-negotiable, but timing matters just as much. Water early morning so leaves dry quickly, preventing fungal issues. I use a soaker hose to deliver water directly to the root zone without disturbing the mulch. For established plants, let the top 2 inches of soil dry slightly between waterings—this encourages deeper root growth and prevents surface crusting.
Pro Tips for Curly Leaf Hosta
- Here's what I learned after years of growing these stunning variegated beauties—tricks that make all the difference b...
- Light Location Secrets: That 4-6 hours of morning sun is crucial, but what matters most is the quality of shade. I've...
- Soil Prep That Makes a Difference: When amending soil with 2-3 inches of compost into the top 8 inches, don't just mi...
Frequently asked questions
Why does my curly leaf hosta look scruffy or ragged?
Curly leaf hostas naturally develop crinkled, wavy foliage as they mature, but excessive raggedness often signals stress. Check for underwatering (soil should stay moist but not soggy) or overcrowding. If leaves are yellowing or browning at the edges, it may also indicate sunburn—relocate to dappled shade if outdoors.
What pests should I watch for on curly leaf hostas?
The most common culprits are slugs, snails, and aphids. Slugs leave silver trails and chewed holes, while aphids cluster on undersides of leaves (use neem oil or insecticidal soap). For prevention, mulch heavily and handpick pests early. Curly leaves can also attract Japanese beetles—cover plants with floating row fabric if needed.
How long does it take for curly leaf hosta to mature?
Expect 3–5 years for full maturity, when leaves reach their signature bold variegation and tight curls. Growth slows in hot summers or poor soil, so amend with organic compost and ensure consistent moisture. Patience pays off—mature plants develop thicker stems and larger leaves (8–12" wide)!
Can I grow curly leaf hosta in containers?
Choose a 12"+ pot with drainage holes and use a well-draining mix (50% potting soil, 30% perlite, 20% compost). Variegated leaves need bright, indirect light—place near east or north windows. Repot every 2–3 years and fertilize lightly in spring (use a balanced 10-10-10 formula).
Do curly leaf hostas survive winter?
Yes! They’re hardy to USDA Zones 3–9, but mulch heavily (4–6" of straw or shredded leaves) in Zone 3–5 to protect roots. Variegated leaves may brown in cold snaps but regrow in spring. Avoid wet mulch—keep it dry to prevent rot. In Zone 9+, watch for heat stress; provide afternoon shade.
When should I divide my curly leaf hosta?
Divide in early spring (March–April) or fall (September–October) when the plant is dormant or actively growing. Wait until the clump is 3–4 years old and has 3+ shoots. Use a sharp knife, replant divisions 12" apart, and water thoroughly post-division. Pro tip: Discard the oldest, woody center to encourage vigorous regrowth!
Wrapping up and next steps
Growing curly leaf hosta is a rewarding journey that brings bold variegation and lush texture to your shade garden—even if you’re a beginner! 🌿 With the right soil, consistent moisture, and a watchful eye for pests and diseases, your hostas will thrive and become a standout feature in your landscape. Now’s the perfect time to act: grab those gloves, prep your planting spot, and watch your shade-loving beauties flourish into stunning foliage statements!
Ready to dive in? Start by selecting the right variety and review the essentials—your future hosta patch awaits!