
Watering
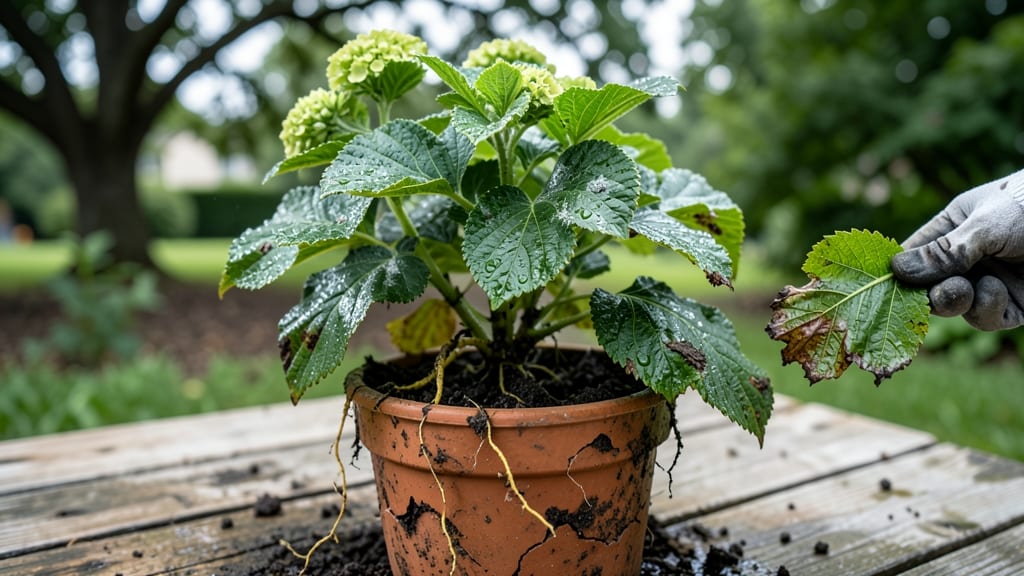
See these too much water pictures of hydrangea leaf problems—yellowing, wilting, or turning brown at the edges? 🌿 That’s overwatering, and it’s easier to fix than you think.
I’ve nursed back more than my share of soggy hydrangeas, and the key starts with recognizing the exact signs: drooping stems, mushy roots, and leaves that feel limp even when the soil’s damp. The good news? With the right adjustments, your plants can bounce back in just a few weeks.
Overwatering happens when roots suffocate from poor drainage or inconsistent watering. Hydrangeas hate soggy feet—their roots need air, not a swamp. Look for yellowing leaves with green veins (a classic overwatering sign) or brown, crispy edges that say, “I’m drowning here.”
The soil might smell sour or feel clumpy, not crumbly. Once you spot these clues, it’s time to act before root rot sets in.
Start by checking your watering routine—most hydrangeas need 1-1.5 inches of water per week, but that depends on your soil and climate. Amend heavy clay soil with compost to improve drainage, and consider raised beds if your yard stays waterlogged.
Prune any mushy stems back to healthy growth, and let the soil dry out between waterings. Within 2-3 weeks, you’ll see fresh green leaves pushing through.
Prevent future problems by testing your soil’s moisture level with your finger—if the top 2 inches are damp, wait before watering again. Mulch around the base to regulate moisture, and choose well-draining pots if you grow hydrangeas in containers. A little vigilance now means lush, blooming plants all season long.
Overwatering’s Hidden Damage
When hydrangeas drown in excess moisture, their leaf problems aren’t just a cosmetic issue—they’re a cry for help from roots struggling to breathe. Understanding the root causes (literally!) of overwatering helps you intervene before wilting, yellowing, or brown edges turn your lush shrubs into a sad, soggy mess.
Here’s why too much water turns hydrangea leaves into a botanical red flag:
Hydrangeas thrive in well-draining soil, but when water pools around roots, it displaces oxygen—a critical nutrient for cellular respiration. Without oxygen, roots can’t absorb nutrients or expel toxins, leading to:
- Yellowing leaves (chlorosis): A classic sign of nutrient deficiency, as roots fail to uptake iron, magnesium, or nitrogen.
- Stunted growth: New leaves emerge smaller or deformed, as the plant diverts energy to survival.
- Root rot: Fungal pathogens like Phytophthora or Pythium thrive in waterlogged soil, rotting roots and blocking water/nutrient flow.
Pro Tip: 💡 Test your soil’s drainage by digging a 6-inch hole, filling it with water, and timing how long it takes to drain. If it’s slower than 4–6 hours, amend with perlite or compost to improve aeration.
Excess water leaches nutrients but also traps salts and chemicals in the soil, creating a toxic brew. Over time, this causes:
- Brown, crispy leaf edges: A sign of salt burn, where accumulated minerals (like sodium or chlorine) disrupt cell function.
- Leaf drop: The plant sheds damaged foliage to conserve energy, often starting with older leaves.
- Blackened stems: Fungal infections (e.g., Botrytis) exploit waterlogged conditions, causing dark, mushy spots.
Why it happens: Hydrangeas in containers or clay-heavy soil are especially vulnerable, as water evaporates slowly, leaving salts behind. Pro Tip: 🌡️ Flush the soil annually with 2–3 gallons of water to leach excess salts—aim for runoff from the drainage holes.
Hydrangeas aren’t just suffering from root issues—their leaves become battlegrounds when excess moisture lingers. Fungi like Septoria leaf spot or Powdery Mildew exploit damp conditions to:
- Create dark spots with yellow halos (Septoria) or white, powdery patches (Mildew).
- Clog stomata (leaf pores), preventing gas exchange and causing leaf scorch (brown, papery edges).
- Weaken the plant, making it susceptible to secondary infections.
Key trigger: Water sitting on leaves for more than 6 hours (e.g., overhead watering in humid climates). Pro Tip: ✨ Water at the base in the morning, and avoid mulching too close to stems to improve airflow.
Cold, waterlogged soil can’t regulate temperature, leading to physiological stress that manifests as:
- Purple or red leaf veins: A sign of anthocyanin production, the plant’s sunscreen to protect damaged cells.
- Slow wilting: Leaves droop but don’t crisp, as the plant’s vascular system struggles to transport water.
- Cold damage: In winter, soggy soil can freeze more easily, shocking roots and causing leaf discoloration in spring.
Science note: Soil temperature drops 3–5°F colder when saturated, accelerating stress. Pro Tip: 🔥 In winter, reduce watering by 50% and use gravel mulch (not organic) to insulate roots.
Each of these causes shares one common thread: roots can’t function. The good news? Hydrangeas are resilient—with the right adjustments, you can revive them before leaf problems become permanent. Stay tuned for diagnosis tips and step-by-step fixes to turn your soggy shrubs back into showstoppers!
Reviving Your Hydrangeas: Step-by-Step Fixes
---
If your hydrangeas are showing signs of too much water—yellowing leaves, wilting, or mushy stems—don’t panic! With the right care, you can nurse them back to health. Below are targeted solutions for each common overwatering symptom, along with prevention tips to keep your plants thriving.
Let’s turn those sad leaves into lush, happy foliage! 🌿💧
---
Yellowing or brown leaves are the first red flags that your hydrangeas are drowning in excess moisture. Here’s how to fix it:
#### 🔥 Step 1: Stop Watering Immediately - Let the soil dry out completely before watering again. Stick your finger 2–3 inches into the soil—if it’s damp, wait a few more days. - Pro Tip: Hydrangeas prefer slightly moist (not soggy) soil.
Aim for watering only when the top 1–2 inches of soil feel dry. 🌡️
#### 🍳 Step 2: Improve Soil Drainage - If your hydrangeas are in containers, repot them into a mix with perlite, sand, or orchid bark to boost drainage. - For in-ground plants, amend the soil with compost or a 50/50 mix of garden soil and perlite to prevent compaction.
#### 👨🍳 Step 3: Prune Damaged Foliage - Snip off yellow or brown leaves with clean pruners to redirect the plant’s energy to healthy growth. - Avoid pruning green leaves—even if they’re weak, they’re still photosynthesizing!
#### ⏰ Step 4: Monitor Watering Moving Forward - Water deeply but infrequently. A slow drip irrigation system or soaker hose can help avoid oversaturation. - Prevention Tip: Group hydrangeas with plants that have similar water needs to streamline care. 🎯
---
Wilting is a sign of root suffocation or fungal issues from soggy soil. Act fast to revive your plant!
#### 🔥 Step 1: Check for Root Rot - Gently dig around the base of the plant (if in-ground) or remove it from the pot to inspect the roots. - Healthy roots are firm and white; rotted roots are mushy, black, or smell foul.
Trim away any diseased roots with sterilized scissors.
#### 🍳 Step 2: Repot or Refresh the Soil - If root rot is severe, repot the hydrangea into fresh, well-draining soil and a slightly larger container (if potted). - For in-ground plants, loosen the soil around the roots and mix in compost and perlite to improve aeration.
#### 👨🍳 Step 3: Adjust Watering Habits - Water only when the top 2 inches of soil are dry. Use a moisture meter for accuracy. - Pro Tip: Water in the morning to allow foliage to dry out, reducing fungal risks. ☀️
#### ✨ Step 4: Boost Recovery with Fertilizer - Once the plant stabilizes, feed it with a balanced, slow-release fertilizer (like 10-10-10) to encourage new growth. - Avoid high-nitrogen fertilizers—they can stress already compromised roots.
---
If your hydrangea’s stems are soft, hollow, or the plant is toppling over, it’s in critical condition. Act quickly!
#### 🔥 Step 1: Emergency Drainage Fix - For potted hydrangeas, place the container in a shallow tray of water for 10–15 minutes to help flush out excess moisture, then drain thoroughly. - If in-ground, create a drainage trench around the base to redirect water away from the roots.
#### 🍳 Step 2: Prune Severely (If Necessary) - If the stems are mushy and collapsing, cut back the plant by one-third to remove dead tissue and encourage new shoots. - Warning: If more than 50% of the plant is rotted, it may not recover.
Consider propagating healthy cuttings instead. 🌱
#### 👨🍳 Step 3: Fungal Treatment (If Needed) - Spritz the plant with a copper fungicide or neem oil to prevent or treat root/fungal infections. - Remove any mulch near the base to improve airflow and reduce humidity.
#### 💡 Prevention Tip: - Plant hydrangeas in raised beds or on slopes to prevent water pooling. - Use drip irrigation with a timer to control water delivery precisely. ⏰
---
Once your hydrangeas are back on track, keep these habits to prevent future overwatering:
- Test your soil: Use a moisture meter or the finger test to check dryness before watering. 📊
- Choose the right pot: Ensure containers have drainage holes and are the appropriate size (not too large).
- Mulch wisely: Apply 2–3 inches of organic mulch (like pine bark) around the base, but keep it away from the stem to avoid rot.
- Water deeply but less often: Hydrangeas prefer 1–1.5 inches of water per week, including rainfall. Adjust for your climate!
- Watch for signs: Yellowing leaves, wilting, or moldy soil are early warnings—don’t ignore them!
With these fixes, your hydrangeas should bounce back stronger than ever. Soon, you’ll be admiring those iconic blooms without a worry in the world! 🌸💦
Frequently asked questions
Why do hydrangea leaves turn yellow with green veins when overwatered?
This classic sign—called chlorosis—happens when roots can't absorb iron or magnesium due to waterlogged soil. The green veins stay because they contain chlorophyll, but the leaf tissue between them starves for nutrients. Think of it like a plant with a traffic jam in its roots!
Can I save a hydrangea with mushy stems and blackened leaves?
It depends! If only the stems are mushy (not the whole plant), cut back to healthy growth and repot in fresh, well-draining soil. For severe cases, check roots—if more than 50% are black and smelly, propagation from healthy cuttings may be your best bet.
How often should I water hydrangeas to avoid overwatering?
Aim for 1-1.5 inches of water per week (rain + irrigation), but check soil first! Stick your finger 2 inches deep—if damp, wait. Morning watering prevents fungal growth, and containers need daily checks in hot weather. A moisture meter helps too!
What’s the fastest way to fix soggy hydrangea soil?
For potted plants: Remove, trim rotted roots, and repot in a 50/50 mix of perlite and potting soil. For in-ground: Dig a drainage trench around the base. Both methods improve airflow in 24 hours, but recovery takes 2-3 weeks for new growth.
Will my hydrangea recover if I see white powdery spots on leaves?
Yes, but act fast! That’s powdery mildew, thriving in damp conditions. Prune affected leaves, improve airflow, and spray with neem oil. Remove mulch from the stem and water at the base—no overhead watering! Within 1-2 weeks, new growth should be mildew-free.